Last Saturday, I replaced a 12-inch PowerBook G4’s internal hard drive
Posted by Pierre Igot in: MacintoshJuly 23rd, 2007 • 10:24 am
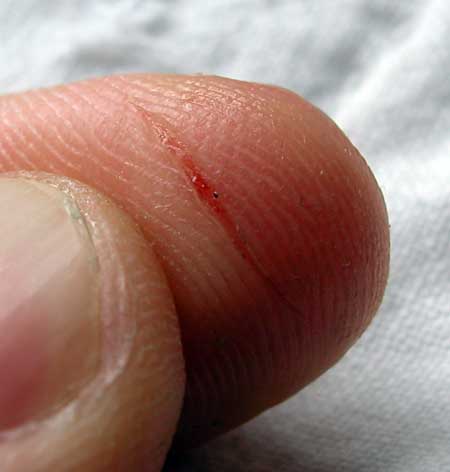
… and I have the scar to prove it:
That was one nasty repair adventure.
A couple of weeks ago, a friend of mine asked me if it would be feasible to replace her PowerBook G4’s hard drive. Having done this myself a few years back on our old Titanium PowerBook G4, I replied, “Sure!”—and gave her a link to the page for laptop hard drives at Other World Computing.
She ordered a 160 GB Seagate drive, and dropped by on Saturday for the installation. That’s when I realized that her PowerBook G4 was actually the 12-inch model, not a bigger model as I had thought.
I prepared myself by doing a quick search for installation instructions on the Web. I first went to Apple’s “Do-It-Yourself Parts & Service” page, and discovered that the internal hard drive for the 12-inch PowerBook G4 was not a customer-installable part.
I was not overly surprised, as I expected that anything that required more than few screws to be removed would officially be a procedure requiring an “authorized Apple service provider.”
I then tried to see if Apple’s support pages for the PowerBook G4 contained any instructions about this particular procedure. I was first able to confirm that Apple’s search engine is useless. I did a search for “replace hard drive” on PowerBook G4 support pages only, and did not get any results with the word “replace” in them—only with “hard” and “drive,” which was not particularly helpful.
Now, I realize that this was probably, in part, because Apple’s public support site does not actually include instructions for this particular procedure, since it is a procedure reserved for authorized repair shops. But I still find it rather amazing that a search engine request with “replace” as the first keyword to search for did not return any results with “replace” in them.
I then switched to good old Google and tried a search for “PowerBook G4 12 replace hard drive” restricted to “site:apple.com.”
The results were somewhat more encouraging, with the first result being a link to an Apple site page on replacing the internal hard drive of a PowerBook G4 (Gigabit Ethernet). Unfortunately, that was a different PowerBook model, so the instructions could not be used. And there were no results for other PowerBook models…
It was time to switch to a third-party source, so I went to xlr8yourmac.com. Their own search engine is not much better than Apple’s, however, and I wasn’t able to find a page for this particular procedure.
Finally, I went back to Google and did a web-wide search for “PowerBook G4 12 inches replace hard drive.” And the first result was… a page on the xlr8yourmac.com web site for the exact procedure I was looking for: “PowerBook G4 12in Hard Drive Swap.” Finally!
So with my own MacBook Pro on the site with this page on it, I started taking the PowerBook G4 apart. I had very vague recollections of having read about how hard the hard drive was to replace on certain PowerBook models, but I really did not anticipate that it would be so (literally) painful.
For the most part, the instructions were good, if a bit elliptic. They only forgot to mention a couple of screws at some step near the end. But the sheer number of screws of different shapes and sizes to remove was quite amazing. And the procedure required a number of different tools, which fortunately I had in my collection.
The most painful step was the removal of the upper part of the case. I never did find the “clips holding the case in place” that the page mentions. What I did find was that it took a lot of patient pulling and twisting to finally force the edges of the case out of their grooves. Along the way, I managed to put my left index finger on a very sharp piece of metal that needed to be lifted along with the rest and felt a sharp sting, although I didn’t realize how bad it was right away. It was only 30 seconds later, when my friend, who was sitting next to me, mentioned that I had blood on my finger, that I took a closer look and saw a long, deep cut. Fortunately, the cut itself was very thin, so I was able to stop the bleeding pretty quickly with a Band Aid.
In any case, after yet more pulling and twisting, I did finally managed to get the upper part of the case off, and the hard drive was finally accessible. There were just two more screws holding the hard drive in place… Unfortunately, I soon discovered that these two screws were the hardest to remove of the whole lot—not because they were difficult to access, but simply because they were screwed on so tightly and had (obviously) never been unscrewed. The small screwdriver I needed to use to unscrew them did not have a very big handle, and I simply was not able to apply enough force to make the screws move.
After a lot of effort, I finally did get one screw off. As for the other one, however, the more I worked on it, the more I ended up damaging the +-shaped groove on the screw head itself, to the point that I just knew I would never be able to unscrew it with the tools that I had at my disposal.
We were so close, and yet we were facing the very real possibility of being unable to remove the hard drive and having to put everything back together without having replaced the hard drive.
I then noticed that this particular screw I was having so much difficulty with was actually on an elevated metal plate, and there was some kind of metal spacer with flat edges underneath that. I then figured that we had nothing to lose and grabbed a pair of pliers. I tried to “unscrew” the space itself, which, as far as I could tell, was either screwed or glued on the board underneath. I did manage to unscrew it, and I could see the head of the damaged screw on top rotating along with it. After a while, I grabbed my screwdriver again and had another go at the screw.
Miracle of miracles! Even though the head was quite badly damaged, my fiddling with the spacer had actually managed to loosen the screw itself somewhat, and I was able to take it off. Phew!
Replacing the hard drive after that was a piece of cake. I put the two screws back on, knowing full well that I would no longer be able to screw the damaged screw in properly. I just went as far as I could with it, and made sure the other screw was firmly in place, so that the hard drive was still held firmly in place.
I then had to put the whole laptop back together, which I fortunately managed to do without having misplaced any screws. (There were at least 25 or 30 of them in total.)
The new hard drive worked just fine, and the machine was soon operational again, with a much bigger internal hard drive and no visible sign of what it had just been through.
In all, the whole procedure took at least a couple of hours. I didn’t break anything, except for the damage to that screw near the end that was just screwed on too tightly. Maybe I would have avoided this with better tools. Who knows? I probably will not have to do this again in my entire life, but it sure was quite an adventure.
[UPDATE: A reader rightly notes that, since the hard drive was bought from OWC, I should have checked their own web site, which features a number of instructional presentations. That said, their laptops support page doesn’t mention anything about replacing the hard drive in the 12-inch PowerBook G4. And the installation instruction and videos page doesn’t have anything either. Other tutorials at OWC are actually links to pages on xlr8yourmac.com, so I wasn’t too far off anyway.
Another reader points to this page at powerbookmedic.com, which does include a complete manual for taking apart the 12-inch PowerBook G4.]
[SECOND UPDATE: Another valuable link to the Faqintosh web site , whose guides are equally comprehensive. I should stress, however, that my main problem here was not with finding instructions, but with issues that no instruction guide actually covers: sharp edges, screws that are so tightly screwed on that it seems impossible to take them off, etc.]
July 23rd, 2007 at Jul 23, 07 | 1:39 pm
Yes, the PowerBook G4 12″ is one of the worst models to work on. Glad you survived the experience.
July 23rd, 2007 at Jul 23, 07 | 6:31 pm
Well, I am mostly glad that the PowerBook itself survived the experience!
July 24th, 2007 at Jul 24, 07 | 12:16 am
I have done several hard drive swaps in iBook G3s, which I think are fairly similar (though thankfully there’s more plastic and less metal in the case, so the edges aren’t quite as sharp). When my own G3 ‘Book finally died, I wanted to get the hard drive out of it, and found it quite satisfying to just cut my way in with shears :-)
October 1st, 2007 at Oct 01, 07 | 5:30 am
Thanks for the shear-cutting idea, Dan. Sounds like the easiest way to stop procrastinating and remove the drive from my decreased iBook G3 before Leopard is released so it’s ready for a temporary test installation.