From Pages ’09 to the web: An XML-based workflow
Posted by Pierre Igot in: Blogging, PagesApril 22nd, 2011 • 9:40 am
A couple of weeks ago, I set up a new French-language web site at www.fauxamis.fr on which I discuss various issues relating to what linguists call “false friends” or “deceptive cognates” between English and French.
The site is WordPress-based, but is not exactly a blog. It’s more like a repository where I will gradually add more and more entries in various categories, which can be searched and explored in various ways. (I might try and find a WordPress plug-in that would enable me to eventually provide alphabetical lists.)
When I set up this site, I decided that I didn’t want to use the same type of workflow that I use for this Betalogue web site, where I compose all blog items manually in HTML in BBEdit. The BBEdit-based approach makes sense for this blog because rich text formatting is not as important.
For the www.fauxamis.fr web site, I wanted a more writer-friendly approach, so that I could better focus on what I was writing and rely on smart rich text formatting to make specific things stand out. I decided that I would try and come up with a workflow that involved composing the articles in Pages ’09 and then using several automated tasks to prepare the articles for posting via the WordPress dashboard.
There were several reasons for this.
First and foremost, I felt that a WYISWYG approach was necessary because, as I said, and as you can see if you visit the site (even if you don’t understand French), I needed to make certain things stand out by using different foreground and background colours. If I had to compose such articles in BBEdit using my CSS styles directly with div and span tags, even if I could automate things somewhat with BBEdit’s glossary features, like I do for this blog, it would quickly make the text more or less illegible, because I wouldn’t be able to rely on the visual clues associated with each CSS style myself.
It’s already a bit challenging for me to proof-read my Betalogue articles while I am composing them in BBEdit, because of the various tags that I have to add to my text. I often find errors that I failed to catch in BBEdit and only see once I preview the post on the web, with the CSS styles properly applied to the text.
With this other site, the problem would be even worse. It was not just because of the three-colour scheme used for the various examples. I also wanted to “future-proof” my entries by tagging them properly with “smart” CSS styles, i.e. styles that might have the same visual aspect, but still carry more hidden information about what the styled text actually is. In particular, I was going to frequently quote English and French words and phrases as words and phrases. I wanted to use the same font formatting for both (simply italics), but to have some hidden information about the fact that the English words are in English and the French words are in French.
In other words, I was going to need at least three paragraph styles for the coloured examples and two character styles for English and French words quoted as words. Seeing all these div and span tags around all these words and sentences would be highly distracting when trying to read or proof-read my texts.
These requirements clearly ruled out the built-in WYSIWYG editor in WordPress’s dashboard, which only offers basic manual formatting with no options for custom styles. It also ruled out a blog editor such as MarsEdit, because its WYSIWYG editor is similarly limited. I could use MarsEdit in HTML text editing mode with custom-designed entries for my styles, but that was not a solution, because I wanted WYSIWYG. And if I wanted HTML text editing, I could do it in BBEdit. Maybe one day MarsEdit will be improved to support custom CSS styles in WYSIWYG editing, but right now it does not support those.
The second consideration was that I simply did not want to use Microsoft Word for WYSIWYG editing. I positively hate this atrocious piece of crap and the less I have to use it, the happier I am.
Pages ’09 is my word processor of choice and I created a template with all the paragraph styles and character styles that I would need. I assigned the keyboard shortcuts I wanted to the styles I would be using most often. Pages ’09 is very limited in the shortcuts it supports for styles (only the F1 to F8 keys are allowed), which is why I use Keyboard Maestro and AppleScript for more flexibility in that department. But at least the shortcuts can easily be assigned on a document-specific basis, so since I don’t need all the other styles I normally use I can use F keys for these particular styles in this particular template. (As far as I can recall from the last time I attempted such a thing, trying to store keyboard shortcuts in specific documents in Microsoft Word as opposed to the Normal template creates massive headaches with Word thinking that your documents contain macro viruses and what not.)
So the WYSIWYG editing part of the equation was fairly easily to deal with. But what about converting all that styled text into WordPress-ready HTML code? That would be much trickier, for one main reason, which is that Pages ’09’s Find/Replace feature is woefully limited in what it can do.
You can search for occurrences of specific character styles and paragraph styles (but not for occurrences of manual formatting options). However, you can only use the Find/Replace dialog to replace one style with another style. Since there is no special code for inserting “the found text” in the “Replace” field, there is no option to find every occurrence of a given style and insert tags before and after each occurrence, which is essential if you want to prepare your text for web posting.
Of course, Microsoft Word does have such an option — but there was simply no way that I was going to concede defeat so easily in my quest to have a healthy, Microsoft-free workflow.
Pages ’09 has no option to export a document in HTML, but even if it did, I suspect it wouldn’t be so good at converting every style into a proper CSS style with only the options that I wanted and not all kinds of undesirable cruft.
I remembered reading about the fact that the Pages ’09 file format is simply a compressed package, so I figured that I would try and decompress the package to see what its actually contained and see if I could do anything with it. (Earlier versions of Pages used a package format without compression, so it’s easier to see what it contains by simply using the Finder’s “Show Package Contents” command.)
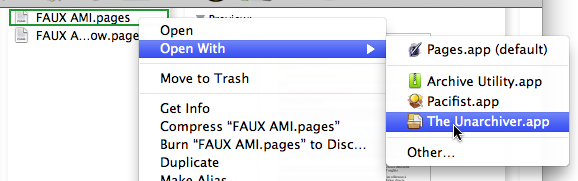
I soon found that I could simply use the free third-party tool called The Unarchiver, which I already use as a replacement for Mac OS X’s built-in Archive Utility application, to decompress a Pages document into a folder containing several files:
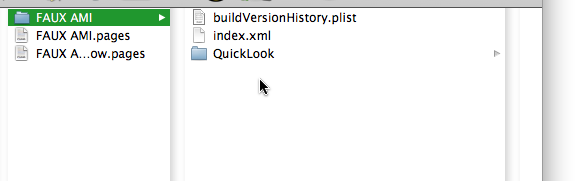
After using The Unarchiver, I would get this:
I opened the index.xml file with BBEdit and quickly saw that I had something that I might be able to work with, because the XML code used an HTML-like tagging scheme and the occurrences of styled text that I needed to convert had distinctive tags.
After a fair bit of trial and error (I am not a grep specialist!), I ended up settling for the following AppleScript script:
ttell application "BBEdit"
activate
replace "<sf:lnbr/>" using "\\<br /\\>" searching in text 1 of selection options {search mode:grep, starting at top:true, wrap around:false, backwards:false, case sensitive:true, match words:false, extend selection:false}
replace "(<sf:p sf:style=\"paragraph-style-32\">)(.*?)(br/>)" using "\\1\\<p\\>\\2\\</p\\>" searching in text 1 of selection options {search mode:grep, starting at top:true, wrap around:false, backwards:false, case sensitive:true, match words:false, extend selection:false}
replace "(<sf:p sf:style=\"paragraph-style-47\">)(.*?)(br/>)" using "\\1\\<div class=\"exEN\"\\>\\2\\</div\\>" searching in text 1 of selection options {search mode:grep, starting at top:true, wrap around:false, backwards:false, case sensitive:true, match words:false, extend selection:false}
replace "(<sf:p sf:style=\"paragraph-style-50\">)(.*?)(br/>)" using "\\1\\<div class=\"exFRbad\"\\>\\2\\</div\\>" searching in text 1 of selection options {search mode:grep, starting at top:true, wrap around:false, backwards:false, case sensitive:true, match words:false, extend selection:false}
replace "(<sf:p sf:style=\"paragraph-style-52\">)(.*?)(br/>)" using "\\1\\<div class=\"exFR\"\\>\\2\\</div\\>" searching in text 1 of selection options {search mode:grep, starting at top:true, wrap around:false, backwards:false, case sensitive:true, match words:false, extend selection:false}
replace "(<sf:p sf:style=\"SFWPParagraphStyle-110\">)(.*?)(br/>)" using "\\1\\<li\\&<amp;#x3E;\\2\\</li\\>" searching in text 1 of selection options {search mode:grep, starting at top:true, wrap around:false, backwards:false, case sensitive:true, match words:false, extend selection:false}
replace "<sf:span sf:style=\"character-style-15\">(.*?)</sf:span>" using "<sf:span sf:style=\"character-style-15\">\\<span class=\"wordEN\"\\>\\1\\</span\\></sf:span>" searching in text 1 of selection options {search mode:grep, starting at top:true, wrap around:false, backwards:false, case sensitive:true, match words:false, extend selection:false}
replace "<sf:span sf:style=\"character-style-14\">(.*?)</sf:span>" using "<sf:span sf:style=\"character-style-14\">\\<span class=\"wordFR\"\\>\\1\\</span\\></sf:span>" searching in text 1 of selection options {search mode:grep, starting at top:true, wrap around:false, backwards:false, case sensitive:true, match words:false, extend selection:false}
replace "<sf:span sf:style=\"character-style-0\">(.*?)</sf:span>" using "<sf:span sf:style=\"character-style-0\">\\<em\\>\\1\\</em\\></sf:span>" searching in text 1 of selection options {search mode:grep, starting at top:true, wrap around:false, backwards:false, case sensitive:true, match words:false, extend selection:false}
replace "<sf:span sf:style=\"character-style-5\">(.*?)</sf:span>" using "<sf:span sf:style=\"character-style-5\">\\<strong\\>\\1\\</strong\\></sf:span>" searching in text 1 of selection options {search mode:grep, starting at top:true, wrap around:false, backwards:false, case sensitive:true, match words:false, extend selection:false}
replace "<sf:span sf:style=\"SFWPCharacterStyle-21\">(.*?)</sf:span>" using "<sf:span sf:style=\"SFWPCharacterStyle-21\">\\<strong\\>\\1\\</strong\\></sf:span>" searching in text 1 of selection options {search mode:grep, starting at top:true, wrap around:false, backwards:false, case sensitive:true, match words:false, extend selection:false}
end tell
It’s obviously not easy to read, but in a nutshell it’s a series of Find/Replace operations using BBEdit in grep mode to insert the required HTML code before and after certain XML tags that involve user-defined paragraph and character styles.
I also added entries for inserting the br tag where there were manual linebreaks in the Pages ’09 document and p tags around paragraphs, as well as li tags for list items (I still have to insert the ul or ol tag manually afterwards) and the em and strong tags for regular and strong emphasis.
As you can see if you examine the code above, there are several hurdles to overcome, including the fact that the XML code created by Pages ’09 refers to the styles by a number or not by their name. There are also issues with escaping specific characters (quotation mark, ampersand) in AppleScript for grep expressions, which make the grep patterns even harder to read.
But basically these Find/Replace operations in BBEdit work and insert the tags I need around the found occurrences of specific character and paragraph styles.
The step that remains is to display all that XML code back in a form that is usable for the purposes of posting it on the web via WordPress’s dashboard.
Here, it turns out that it is not necessary to completely reverse the process used to extract the XML file in the first place. All one needs to do is this:
- Select the folder that contains the modified XML file, i.e. the folder that was created by The Unarchiver when it decompressed the Pages ’09 file.
- Edit its name by adding the “.pages” extension to it.
- Press Return.
This will somewhat miraculously turn the folder back into what Mac OS X thinks is a valid Pages ’09 document, which can in turn be opened back in Pages ’09.
The result in Pages ’09 is a document that is identical to the original one, but with HTML tags around all occurrences of the various paragraph and character styles searched for in the AppleScript script.
Then all I have to do is copy this tagged text, paste it into the HTML editor in WordPress and post. The tagged copy of the original Pages ’09 document can then be trashed, since it can easily be recreated using the procedure described here. (It is also a somewhat damaged Pages ’09 file, because the script above does create some slightly inappropriate XML code, which fortunately does not affect Pages ’09’s ability to render the code just for the purposes of copying and pasting it into WordPress.)
You might argue that I made things unnecessarily complicated and that I could simply have written a script with a sequence of BBEdit Find/Replace operations that replace the XML tags with HTML tags and remove all the rest. I then could just copy the code from BBEdit and paste it into the HTML editor in WordPress and post.
The problem is that the XML code used by Pages ’09 also contains all kinds of other stuff that would need to be cleaned up first. Every character that is not a straight universal ASCII character (a-z, A-z, 0-9 and a few other things) is rendered using its Unicode value. For example, the curly apostrophe is ’. Since French contains a lot of non-ASCII characters (accented vowels, c with cedilla, etc.), that means that there is a lot of extra code that would have to be converted in order to make the text readable and editable. (Something like ’ is HTML-ready and can be posted as is, but it’s not exactly readable and readily editable.)
So I tend to prefer my approach, where the tagged text can still be read and edited in Pages ’09 or in WordPress without too much difficulty.
Still, this approach is obviously not ideal. It’s not really possible to manually insert HTML tags before applying the script to the document, because these tags will interfere with or be affected by the grep searches. I cannot even insert a simple URL in my document, because if this URL contains any & (ampersand) characters (and many of them do), my script will remove them and make the URL useless. If I want to do any manual HTML editing, I have to wait until after I have applied the script, which is not always the most convenient.
There is also another issue, which is that, while user-defined styles keep their unique identifying number in the XML code, built-in styles such as the “SFWPCharacterStyle-21” style that is included in my script above appear to be dynamically numbered and can change numbers depending on what other manual formatting options are used within the document. For example, if I use manual superscript or small caps formatting anywhere in the document, the “21” number might change to “22.” This is obviously highly problematic.
I can avoid this issue by using my user-defined styles exclusively for formatting, but it’s not exactly convenient to have user-defined styles for every possible formatting option that I might want to use in my WYSIWYG document in Pages ’09.
In other words, things are not perfect in the workflow described here. But the basic facts remain:
- I can do WYSIWYG editing without relying on the monstrous pile of crap known as Microsoft Word for Mac OS X.
- I can apply and see the various specific paragraph and styles that I need to format my articles while I am writing and editing them.
- With a few simple steps, I can apply a script in BBEdit that inserts the required HTML tags around all occurrences of styled text that need to be tagged.
- I then have a properly tagged text that I can just copy and paste into WordPress’s HTML editor. After a few other manual adjustments, I can post that text and get a properly formatted blog post that uses the custom styles defined in my CSS stylesheet and looks exactly the way I want it to look, and also contains some hidden information that could be very useful in the future if I need to use these posts for other purposes.
Even though the script — and, indeed, the whole process — is highly specific, I thought I’d share it here because it might give some people some ideas about things that can be done with Pages ’09 files.
I still hope that, someday, Apple will add more advanced options to its Find/Replace feature so that one can perform smarter searches and use grep or grep-like tools to match and process specific text strings. But until they do, my own custom-designed workflow will work fine and will enable me to focus on writing and editing my articles in glorious WYSIWYG without losing anything in readability along the way.
April 22nd, 2011 at Apr 22, 11 | 11:02 am
[…] wrote earlier today about a workflow that I have developed for writing posts for another web site that I maintain. […]
April 23rd, 2011 at Apr 23, 11 | 2:52 pm
[…] From Pages ’09 to the Web: An XML-based workflow […]